The next most important thing on the big white board where I keep my TO-DO list is to finally go through all my Commodore PCs and Amigas for a battery check and replacement.
You see, just like modern computers, these older PCs use batteries to maintain power on its internal clock chip. This is why your computer remembers what time it is between reboots. However, the older computers used Nickel-based batteries that, over time, would go bad, leak a base chemical onto the motherboard, and eat away at your computer like an acid!
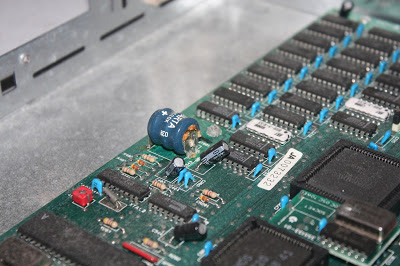
Here you can see a NiCd battery leaking its evil all over the motherboard of a Commodore PC10-III.
The most obvious solution would be to clip out this bad battery and replace it with an identical one. However, that only puts off the next leak for another decade or so. I figured it was better to find a more permanent solution.
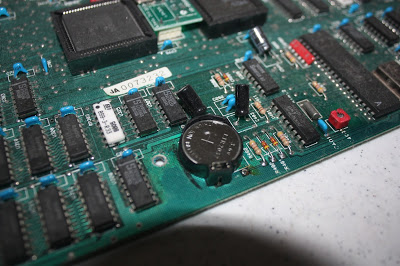
The solution I've been going with is to replace the NiCd battery with a Lithium ION battery holder. This solves several problems: it makes the battery more easily replaceable in the future, Lithium batteries will last many many years longer even than the rechargeable NiCd, and best of all, Lithium batteries don't leak when they go bad; they just fade away.
In the picture above, you can see that my battery holder is two-pin, while the NiCd battery it replaced was three pin. There were two positive-side pins. I chose to solder the positive pin on the battery holder into the hole most removed from the rest of the motherboard, which was important, as I'll explain below.
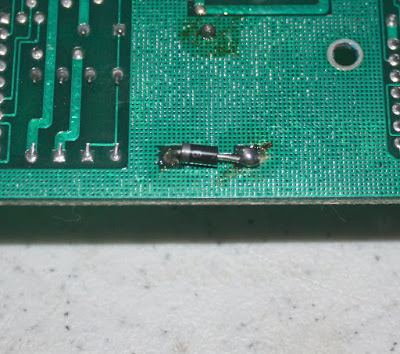
While trying to educate myself about this problem, I learned that the NiCd batteries would push 3.6V into the clock chip when the computer was turned off. However, when it was turned on, the power supply would push 5V back into the battery to recharge it. Some people have said that pushing 5V at a non-rechargeable Lithium battery might actually cause it to explode or something! To prevent this, I followed some advice I found about putting a Shotsky diode between the positive output from the Lithium battery and the motherboard. A diode allows current to flow fairly freely one-way (out of the Lithium battery), but blocks current coming from the other direction (into the Lithium battery).
Since the original battery was two pins, with only one of them going to the clock chip, I saw this as a perfect chance to put my diode across the two old positive holes, on the underside the motherboard, after separating the short between those holes, of course. The 3.6V from the battery would flow through the diode, and from there out to the clock clip.
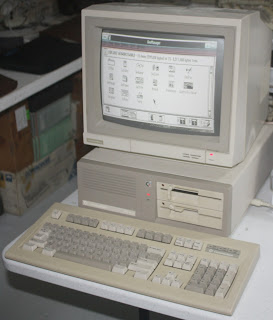
Success! (Yes, this is just a gratuitous picture of the PC10-III running PC-GEOS).
So, later Commodore PC motherboards corrected the mistake of using leaky NiCd batteries by using Lithium batteries as well. Unfortunately, they didn't use battery holders, but did something which, IMHO, was almost worse: they used an integrated battery clock chip in a single monolithic black box. The Lithium-Ion battery is actually underneath that black casing, enclosed in plastic.
This is wonderful for preventing damage to the motherboard from leaking NiCd batteries. However, even the Lithium batteries run out eventually, and then what do you do?
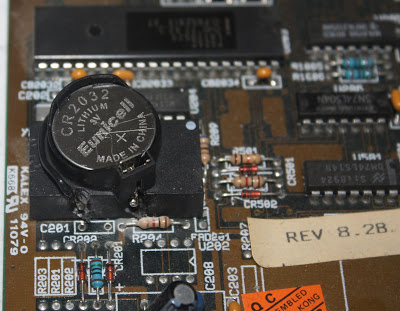
The answer was to carefully drill away at the block-o-plastic to expose the Positive and Negative poles of the internal battery, and then solder on a new battery holder, into which I put a new battery.
I used a very small grinding head on my Dremel tool to slowly expose the hidden pins. I then tested the exposed metal with my multi-meter to confirm I'd really gotten the right ones. If you look carefully, you'll see I actually had to remove a component to get to it.
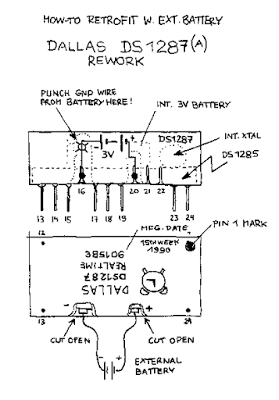
This wonderful picture from Peter Wendt of Germany shows exactly how to go about this. You can read his own account here: http://www.mcamafia.de/mcapage0/dsrework.htm
So, that's what I've been up to. I took down every single one of my Commodore PCs, and I've been slowly taking each one apart, checking for batteries to replace, doing quick tests, taking pictures, and then shuffling them away. :)
Battery replacement in Commodore PC clones: Difference between revisions
Jump to navigation
Jump to search
Bozimmerman (talk | contribs) Created page with "=== When Pee-Cees Leak === <div class="post-header"><div class="post-header-line-1"></div></div><div id="post-body-3426308243375042250" class="post-body entry-content"> The n..." |
Bozimmerman (talk | contribs) |
||
| (One intermediate revision by the same user not shown) | |||
| Line 1: | Line 1: | ||
=== When Pee-Cees Leak === | === When Pee-Cees Leak by Bo Zimmerman === | ||
<div class="post-header"><div class="post-header-line-1"></div></div><div id="post-body-3426308243375042250" class="post-body entry-content"> The next most important thing on the big white board where I keep my TO-DO list is to finally go through all my Commodore PCs and Amigas for a battery check and replacement.<br /><br /> You see, just like modern computers, these older PCs use batteries to maintain power on its internal clock chip. | <div class="post-header"><div class="post-header-line-1"></div></div><div id="post-body-3426308243375042250" class="post-body entry-content"> The next most important thing on the big white board where I keep my TO-DO list is to finally go through all my Commodore PCs and Amigas for a battery check and replacement.<br /><br /> You see, just like modern computers, these older PCs use batteries to maintain power on its internal clock chip. This is why your computer remembers what time it is between reboots. However, the older computers used <span><font color="#333333"><span style="background-color: white"><font face="inherit">Nickel-based batteries that, over time, would go bad, leak a base chemical onto the motherboard, and eat away at your computer like an acid!</font></span></font></span><br /><span><font color="#333333"><span style="background-color: white"><font face="inherit"><br /></font></span></font></span><br /><div class="separator" style="clear: both; text-align: center">[http://3.bp.blogspot.com/-sIGkE_fREEc/VhDIE8gh5tI/AAAAAAAAAjU/IvhEq6bhU4I/s1600/batterySick.jpg [[Image:batterySick.jpg|400px]]]</div><span><font color="#333333"><span style="background-color: white"><font face="inherit"><br /></font></span></font></span> <span><font color="#333333"><span style="background-color: white"><font face="inherit">Here you can see a NiCd battery leaking its evil all over the motherboard of a [http://www.zimmers.net/cbmpics/cpcs.html Commodore PC10-III].</font></span></font></span><br /><span><font color="#333333"><span style="background-color: white"><font face="inherit"><br /></font></span></font></span> <span><font color="#333333"><span style="background-color: white"><font face="inherit">The most obvious solution would be to clip out this bad battery and replace it with an identical one. However, that only puts off the next leak for another decade or so. I figured it was better to find a more permanent solution.</font></span></font></span><br /><span><font color="#333333"><span style="background-color: white"><font face="inherit"><br /></font></span></font></span><br /><div class="separator" style="clear: both; text-align: center">[http://2.bp.blogspot.com/-ZCgSBIV_Tq0/VhDIp4yGAiI/AAAAAAAAAjc/-9mq1dhSbYA/s1600/batteryFixed.jpg [[Image:batteryFixed.jpg|400px]]]</div><span><font color="#333333"><span style="background-color: white"><font face="inherit"><br /></font></span></font></span> <span><font color="#333333"><span style="background-color: white"><font face="inherit">The solution I've been going with is to replace the NiCd battery with a Lithium ION battery holder. This solves several problems: it makes the battery more easily replaceable in the future, Lithium batteries will last many many years longer even than the rechargeable NiCd, and best of all, Lithium batteries don't leak when they go bad; they just fade away.</font></span></font></span><br /><span><font color="#333333"><span style="background-color: white"><font face="inherit"><br /></font></span></font></span> <span><font color="#333333"><span style="background-color: white"><font face="inherit">In the picture above, you can see that my battery holder is two-pin, while the NiCd battery it replaced was three pin. There were two positive-side pins. I chose to solder the positive pin on the battery holder into the hole most removed from the rest of the motherboard, which was important, as I'll explain below.</font></span></font></span><br /><span><font color="#333333"><span style="background-color: white"><font face="inherit"><br /></font></span></font></span><br /><div class="separator" style="clear: both; text-align: center">[http://4.bp.blogspot.com/-HvfgdTj_TQY/VhDJRsVE8FI/AAAAAAAAAjk/VmLbz1TKLDc/s1600/batteryDiode.jpg [[Image:batteryDiode.jpg|400px]]]</div><span><font color="#333333"><span style="background-color: white"><font face="inherit"><br /></font></span></font></span> <span><font color="#333333"><span style="background-color: white">While trying to educate myself about this problem, I learned that the NiCd batteries would push 3.6V into the clock chip when the computer was turned off. However, when it was turned on, the power supply would push 5V back into the battery to recharge it. Some people have said that pushing 5V at a non-rechargeable Lithium battery might actually cause it to explode or something! To prevent this, I followed some advice I found about putting a Shotsky diode between the positive output from the Lithium battery and the motherboard. A diode allows current to flow fairly freely one-way (out of the Lithium battery), but blocks current coming from the other direction (into the Lithium battery).</span></font></span><br /><span><font color="#333333"><span style="background-color: white"><br /></span></font></span> <span><font color="#333333"><span style="background-color: white">Since the original battery was two pins, with only one of them going to the clock chip, I saw this as a perfect chance to put my diode across the two old positive holes, on the underside the motherboard, after separating the short between those holes, of course. The 3.6V from the battery would flow through the diode, and from there out to the clock clip.</span></font></span><br /><span><font color="#333333"><span style="background-color: white"><br /></span></font></span><br /><div class="separator" style="clear: both; text-align: center">[http://3.bp.blogspot.com/-e5hXLbsp4kM/VhDKquTzWxI/AAAAAAAAAjw/vQX5HCJxLqY/s1600/pc10iiiMineAngleSystemRunningGEOS.jpg [[Image:pc10iiiMineAngleSystemRunningGEOS.jpg|400px]]]</div><span><font color="#333333"><span style="background-color: white"><br /></span></font></span> <span><font color="#333333"><span style="background-color: white"><font face="inherit"><br /></font></span></font></span> <span><font color="#333333"><span style="background-color: white"><font face="inherit">Success! (Yes, this is just a gratuitous picture of the PC10-III running PC-GEOS).</font></span></font></span><br /><span><font color="#333333"><span style="background-color: white"><font face="inherit"><br /></font></span></font></span><br /><div class="separator" style="clear: both; text-align: center">[http://2.bp.blogspot.com/-Xrak9psNI_4/VhDLDSlK0DI/AAAAAAAAAj4/VLu4i10E3vo/s1600/batteryDallasBefore.jpg [[Image:batteryDallasBefore.jpg|400px]]]</div><span><font color="#333333"><span style="background-color: white"><font face="inherit"><br /></font></span></font></span> <span><font color="#333333"><span style="background-color: white"><font face="inherit"><br /></font></span></font></span> <span><font color="#333333"><span style="background-color: white">So, later Commodore PC motherboards corrected the mistake of using leaky NiCd batteries by using Lithium batteries as well. Unfortunately, they didn't use battery holders, but did something which, IMHO, was almost worse: they used an integrated battery clock chip in a single monolithic black box. The Lithium-Ion battery is actually underneath that black casing, enclosed in plastic.</span></font></span><br /><span><font color="#333333"><span style="background-color: white"><br /></span></font></span> <span><font color="#333333"><span style="background-color: white">This is wonderful for preventing damage to the motherboard from leaking NiCd batteries. However, even the Lithium batteries run out eventually, and then what do you do? </span></font></span><br /><span><font color="#333333"><span style="background-color: white"><br /></span></font></span><br /><div class="separator" style="clear: both; text-align: center">[http://1.bp.blogspot.com/-kTzWrFXDi90/VhDLlzTe1EI/AAAAAAAAAkA/VR4XojeOj_k/s1600/batteryDallasAfter.jpg [[Image:batteryDallasAfter.jpg|400px]]]</div><span><font color="#333333"><span style="background-color: white"><br /></span></font></span> <span><font color="#333333"><span style="background-color: white"><font face="inherit">The answer was to carefully drill away at the block-o-plastic to expose the Positive and Negative poles of the internal battery, and then solder on a new battery holder, into which I put a new battery.</font></span></font></span><br /><span><font color="#333333"><span style="background-color: white"><font face="inherit"><br /></font></span></font></span> <span><font color="#333333"><span style="background-color: white"><span><font face="inherit">I used a very small grinding head on my Dremel tool to slowly expose the hidden pins. I then tested the exposed metal with my </font></span>multi-meter<span><font face="inherit"> to confirm I'd really gotten the right ones. If you look carefully, you'll see I actually had to remove a component to get to it.</font></span></span></font></span><br /><span><font color="#333333"><span style="background-color: white"><font face="inherit"><br /></font></span></font></span><br /><div class="separator" style="clear: both; text-align: center">[http://3.bp.blogspot.com/-NaGUCGj8loA/VhDMP7wqvFI/AAAAAAAAAkM/5YdSHDuWK7I/s1600/ds1287rw.gif [[Image:ds1287rw.gif|400px]]]</div><span><font color="#333333"><span style="background-color: white"><font face="inherit"><br /></font></span></font></span> <span><font color="#333333"><span style="background-color: white"><font face="inherit">This wonderful picture from Peter Wendt of Germany shows exactly how to go about this. You can read his own account here: </font></span>http://www.mcamafia.de/mcapage0/dsrework.htm</font></span><br /><span><font color="#333333"><br /></font></span> <span><font color="#333333">So, that's what I've been up to. I took down every single one of my Commodore PCs, and I've been slowly taking each one apart, checking for batteries to replace, doing quick tests, taking pictures, and then shuffling them away. :)</font></span><br /><span><font color="#333333"><br /></font></span><br /></div> | ||
